
Importing Joint Fundraising Contributions & FEC Conduit PAC Memo Items
What Are Itemizations?
In Campaign Deputy, Joint Fundraising Committee (JFC) distributions and FEC Conduit PAC Memo items are recorded as Itemizations on a parent contribution record. An itemization breaks down a single contribution into its individual recipients — the people or organizations who ultimately received portions of the funds.
For example, if a Joint Fundraising Committee transfers $5,000 in Contributions, the parent contribution records the full $5,000 from the JFC. Itemizations then record how what donors were part of that $5,000.
Each itemization includes:
Recipient — the person or organization receiving the distribution
Amount — the dollar amount allocated to that recipient
Memo — a description (e.g., "JFC Distribution", "Conduit Memo", or other reference text)
Election — optionally, a different candidate/election than the parent contribution
There are two ways to add itemizations: manually (one at a time through the UI) or via file import (in bulk using a CSV or Excel file).
Finding the Parent Contribution ID
Before you can add itemizations, you need to locate the parent contribution they belong to. Here are several ways to find a contribution and its ID.
Method 1: From the Contributions List
Navigate to Contributions from the main menu.
Browse or search the list of contributions.
Click on a contributor's name or amount to open the contribution's Details page.
The Contribution ID is in the browser's URL bar:
/Contributions/Details/12345
12345 = This is the Contribution ID
Method 2: From a Contribution Export
Go to the Contributions page.
Click Actions (dropdown) > Export.
Enter a date range and export.
Open the exported file — it includes a Contribution ID column you can use to reference contributions for import.
Adding Itemizations Manually
Use this method when you need to add a small number of itemizations one at a time.
Step-by-Step
1. Navigate to the parent contribution's Details page (e.g., /Contributions/Details/12345).
2. Click the Action dropdown button in the top-right corner of the page.
3. Select Add Itemization.
4. A dialog will appear with the following fields:
Field | Description | Required? |
Organization | Search for and select an organization recipient | One of Organization or Person is required |
Person | Search for and select a person recipient | One of Organization or Person is required |
Amount | The dollar amount for this itemization | Yes |
Memo | A description or reference for the itemization | No |
Election | The candidate/election this itemization applies to | No |
5. In the Recipient section, search for either an Organization OR a Person (only one per itemization).
- Start typing in the search box to find existing records.
- Select the correct match from the dropdown.
6. Enter the Amount.
7. Optionally enter a Memo (e.g., "JFC Distribution" or "Conduit Memo").
8. Optionally select an Election if this itemization applies to a different candidate than the parent contribution.
9. Click Add.
The itemization now appears in the Itemization section on the contribution's Details page.
Repeat steps 2-9 for each additional itemization on this contribution. For example, if a $5,000 JFC contribution is distributed to 4 recipients, you would add 4 separate itemizations.
Editing an Itemization
- In the Itemization table on the contribution Details page, click the pencil icon next to the itemization you want to edit.
- Update the fields as needed and save.
Deleting an Itemization
- In the Itemization table, click the trash icon next to the itemization you want to remove.
- Confirm the deletion when prompted.
Amount Validation Note
If your itemization amounts add up to more than the parent contribution amount, a warning message will appear:
> "The Itemizations total to an amount larger than the Contribution. If this is expected, you can ignore this message."
This is informational only and will not block you from saving. In some JFC scenarios, this is normal and expected.
Importing Itemizations via File Import
Use this method when you need to add many itemizations at once, such as importing a full JFC distribution report or a batch of Conduit PAC memo items.
Preparing Your Import File
Your import file should be a CSV or Excel (.xls, .xlsx) file. Each row in the file represents one contribution and its itemization. If you have issues with the file, resave it to another format. You can either:
Create new contributions with itemizations — include all contribution fields plus itemization fields in each row.
Add itemizations to existing contributions — include the Contribution ID column to match existing contributions, plus the itemization fields.
Required Columns
If creating new contributions (no Contribution ID column):
Column | Maps To | Required? |
Contributor First Name | Person First Name | Yes (if individual) |
Contributor Last Name | Person Last Name | Yes (if individual) |
Organization Name | Organization Name | Yes (if organization) |
Contribution Amount | Contribution Amount | Yes |
Contribution Date | Receipt Date | Yes |
Contribution Type | Contribution Type | Yes, Can also be set in the Import Options |
If adding to existing contributions:
Column | Maps To | Required? |
Contribution ID | Contribution ID | Yes |
Itemization columns (always required when importing itemizations):
Mapping an Itemization to the regular Contribution Fields can cause the Itemizations to be added as a regular Contribution. If this is your first time we recommend attempting to import a single Itemization to verify your file.
Column | Maps To | Required? |
Itemization First Name | Person First Name | Yes (if individual) |
Itemization Last Name | Person Last Name | Yes (if individual) |
Itemization Org Name | Organization Name | Yes (if organization) |
Itemization Address | Delivery Line 1 | Required by the FEC |
Itemization Address 2 | Delivery Line 2 | Required by the FEC |
Itemization City | City | Required by the FEC |
Itemization State | State | Required by the FEC |
Itemization Zip | Zip Code | Required by the FEC |
Itemization Amount | Itemization Amount | Yes |
Itemization Date | Itemization Receipt Date | Yes |
Itemization Memo | Itemization Memo | No |
Important: Each itemization row must have either an Organization Name OR both a First Name and Last Name for the recipient — not both.
Import Steps
1. Navigate to Import > Import File from the main menu.
2. Enter an Upload Name (e.g., "JFC Itemizations - January 2026").
3. Click Choose a file and select your CSV or Excel file. Files are limited to 10 MB (up to ~100,000 records).
4. Click Upload.
5. On Step 2 (Import Mapping), you will see your file's columns and a mapping interface:
a. Click the Contributions tab.
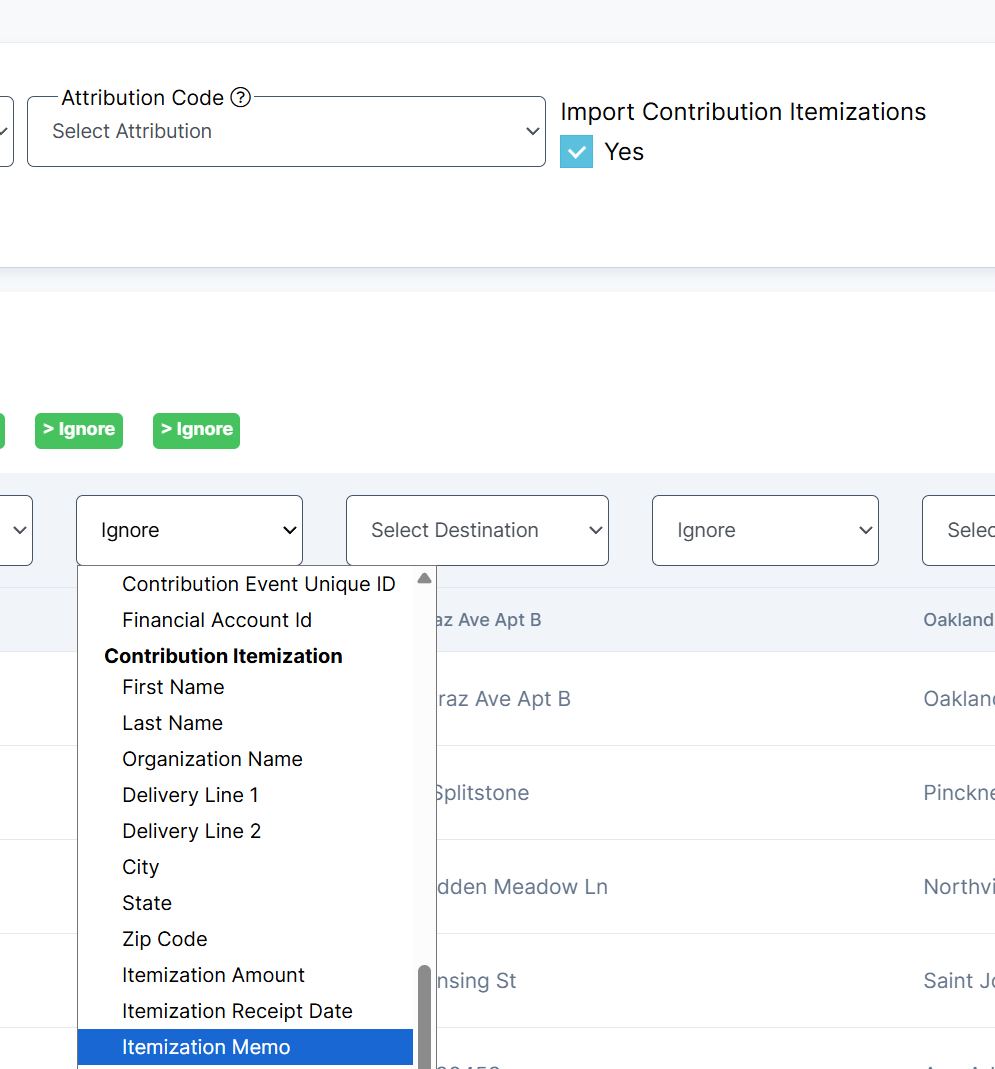
b. Check the "Import Contribution Itemizations" checkbox (labeled "Yes"). This reveals the Contribution Itemization fields in the column mapping dropdowns.
c. Optionally set default values that apply to all rows:
- Receipt Type — Cash, Check, or Credit Card (required if creating new contributions and not mapped as a column)
- Candidate for Import — the election/candidate to associate with
- Attribution Code — an attribution code to apply
d. For each column in your file, use the dropdown to select the matching destination field. Fields are grouped:
- Person group — contributor person fields
- Contribution group — contribution fields (Amount, Date, Contribution ID, etc.)
- Contribution Itemization group — all itemization fields (First Name, Last Name, Organization Name, Address, Amount, Date, Memo)
e. Make sure you map all required fields for both the contribution and the itemization.
6. Click Import to begin processing.
7. Review the import results page to check for any errors or failed rows. Common issues include:
- Missing required address fields on itemization rows
- Missing recipient name (need either Organization Name, or both First Name and Last Name)
- Invalid Contribution ID (if adding to existing contributions)
What Happens During Import
- Person/Organization matching: The system automatically tries to match itemization recipients to existing people or organizations in your database using name and address. If no match is found, a new person or organization record is created.
- Address handling: If you provide both Delivery Line 1 and Delivery Line 2, they are combined into a single address line.
- Contribution matching: If you map a Contribution ID column, the system finds the existing contribution and adds the itemization to it. If no Contribution ID is mapped, a new contribution is created first, then the itemization is added to it.
Tips and Best Practices
- Start with the export. If you need to add itemizations to existing contributions, first export your contributions to get the Contribution IDs. Then build your itemization import file using those IDs.
- One itemization per row. Each row in the import file creates one itemization. If a contribution has 5 recipients, you need 5 rows — all with the same Contribution ID (or the same contributor information if creating new contributions).
- Double-check addresses. The import requires a complete address (street, city, state, zip) for every itemization. Missing any of these fields will cause the row to fail.
- Amount warnings are informational. When adding itemizations manually, the system warns if your itemization totals exceed the parent contribution amount. This is not an error, in some JFC scenarios, itemization totals may legitimately differ from the parent amount.
- Save your mapping as a template. If you import itemizations regularly (e.g., monthly JFC distributions), save your column mapping as a template on Step 2. The next time you import, the system can auto-detect and apply the same mapping.
- Review failed rows. After an import completes, check the results for any failed rows. The error messages will tell you which required fields were missing so you can fix and re-import just those rows.
- Merge Duplicates. Merging duplicates will also transfer over transactions, including Itemizations.